Beaded Chainmaille Jewelry Tutorial — Video 1
Beaded Chainmaille Tutorial Project
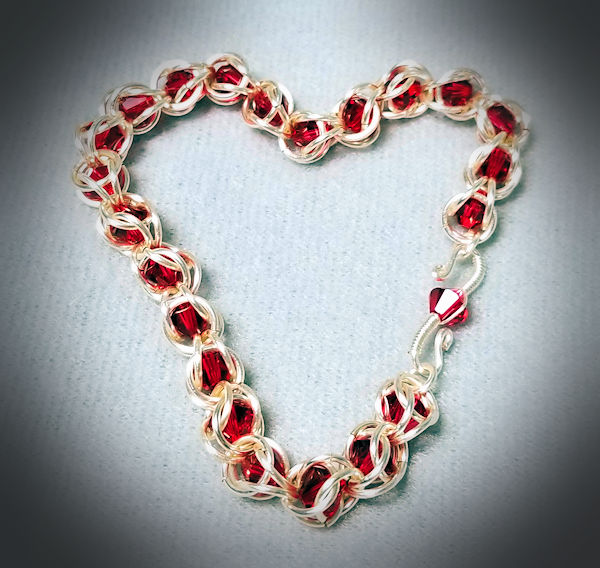
Beaded chainmaille jewelry tutorials are less common than standard chainmaille jewelry patterns, and I thought it was time that I did a video showing some patterns with beads. This is a project video, where we’ll make a bracelet. I also will show some other design options.
Oh, and why do I say “Video 1”? Naturally, I plan for more beaded chainmaille jewelry patterns!
Why Beaded Chainmaille?
Now I have a lot of different chainmaille bracelets — right now I’m wearing a roundmaille, a Turkish roundmaille and a Jens Pind. But up to this point I hadn’t done anything with beads, except as a dangle off an earring. Beaded chainmaille is a change of pace — and I am looking forward to making a bracelet incorporating sterling and pearls.
Supplies You’ll Need
All of the ring gauges list below are AWG. When I say 18 gauge, I mean a 1mm wire diameter.
- 18 gauge 6mm inside diameter rings (AR = 6)
- 6mm bicone beads — I am using Swarovski, in the color Scarlet.
- 18 gauge 3.5mm or 4mm inside diameter (AR = 3.5 or 4)
- Clasp of your choice
You will need approximately 3 beads and 12 of the 6mm ID jump rings per inch of finished chain. As for the small jump rings, you will only need two or so, depending on what kind of clasp you plan to use. (In my case, I elected to make an “S” clasp that used one of the Swarovski bicones.)
If you want to make the green and gold bracelet, you’ll need more of the smaller jump rings and fewer of the large jump rings and bicone beads. And if you want to add a dangle or charm, you’ll need to include those.
Beaded Chainmaille Video Tutorial
Ready…set…let’s get maille-ing with this beaded chainmaille bracelet!
Chain Maille Tutorial – HP 3in1, HP 4in1, DragonBack
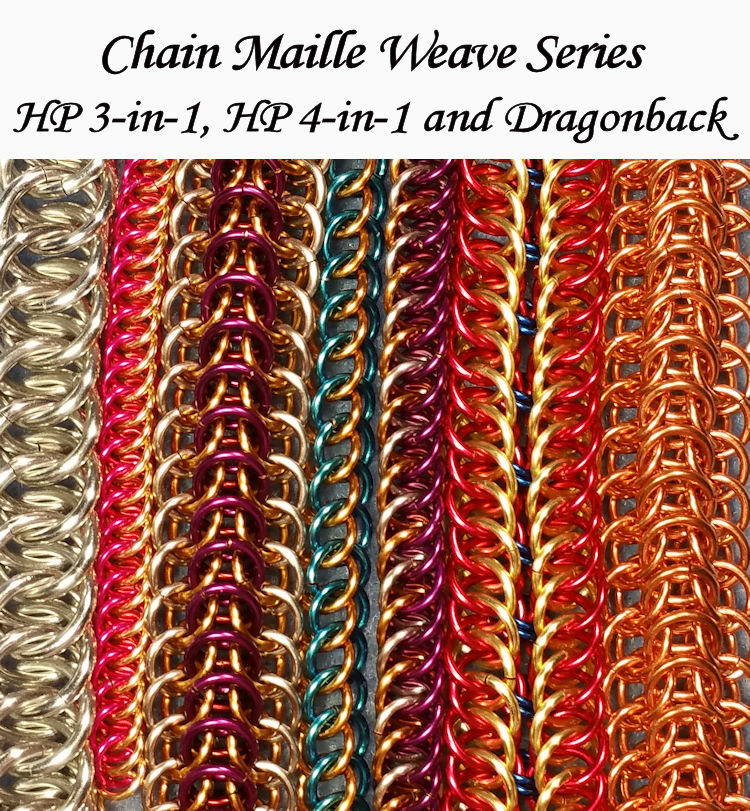
HP 3in1, HP 4in1, DragonBack
The chain maille HP (Half Persian) weaves are intriguing and DragonBack is exciting! Well, at least that’s my opinion. How a person can take the small rings and make such a densely-woven piece of jewelry was amazing to me. Welcome to the HP world!
I know that HP has the reputation of being difficult, but it really isn’t — at least not without a little help in the very beginning (which of course I provide). Then like most weaves, once you have the rhythm, it’s not all that hard at all! There are lots of very detailed photos to show you what ring goes where.
(Note to anyone reading this post on Google Translate — this ebook is written in English.)
What’s in the Tutorial?
We’ll start out with the easiest of the weaves — the HP3in1. With a couple of tips in the very beginning on how to start the weave, it becomes a whole lot easier!
Once you have the hang of that weave, time to move onto the HP 4in1. This is a beautiful, very dense weave. Once again I provide two different ways to start out the weave to make things that much easier!
DragonBack Chain Maille Bracelet
Do you want to double your fun? How about a doubled HP 4in1! It’s actually pretty easy, and it’s reversible in a way that can give you two different looks.
We’ll finish up with DragonBack, which is a weave that is rather unusual and not often seen. It, too, is a dense weave, and it makes a very substantial piece of jewelry. Not to mention an absolutely gorgeous one! But please note — DragonBack and the more commonly-seen DragonScale are not the same weave. In this ebook I teach you DragonBack.
With these weaves, I demonstrate each weave in at least two different color rings, so you can more easily see how the weave is put together. I also show some common mistakes, how to recognize them quickly and how to fix them.
There’s lots in the ebook. It’s 37 pages and has 79 photos, so you have a lot of instructions and plenty of close-ups. The photo at the top of the page shows all the weaves you’ll find in this ebook tutorial. This ebook is in PDF form, and is just a little over 1.6 MB in size.
Purchase the Tutorial
The ebook is just $6, which is a small amount for everything you get, especially with the super-close-up photos — which many times I show multiple angles so you are sure where to put that next ring!
You can buy the ebook securely through the link below. All major credit cards are accepted. Just as an FYI, it does go through the PayPal interface. You will get a link for an immediate download — and then you’re on your way!


Thanks so much for reading this far, and happy maille-ing!
Rhinos Snorting Drano Tutorial
The Rhinos Snorting Drano tutorial was a lot of fun to put together. First of all, I’ve always been intrigued by the name of the weave. I don’t know where it came from, but you have to admit, it’s unusual!
This is one of the orbital patterns of chain maille. An orbital ring is one that does not pass through any other ring; instead it passes around them. (Another example of an orbital weave is Celtic Visions.)
So how do the rings stay in place without going through another ring? In a sense, these are captured rings — in other words, other rings hold them in place.
Typically, orbital chainmaille jewelry patterns are indeed chains as opposed to sheets (although almost any chain can be made into a sheet). And Rhinos Snorting Drano of course falls into that category.
But Rhinos Snorting Drano isn’t just one weave; with a few tweaks, you can have different looks.
The Barrel pattern is one variation, which when done in a tighter weave is quite a tailored look.
A weave that I came up with myself is one called Rhinos Shaken Not Stirred. Depending on your color choices and what ring sizes you choose, it can be anywhere from tailored to funky to elegant. I do want to add that while I’ve checked around a fair amount and haven’t seen this pattern published anywhere else, it’s always possible that someone else has also hit upon this weave. In the meanwhile, I’ll call it my own variation. 🙂
What You Will Learn
Just what will you learn in this tutorial? Here is a sampling of what is in store for you.
- Rhinos Snorting Drano – This is the base weave for the chainmaille jewelry patterns, from which the other weaves are derived.
- Barrel – This is the first variation of the RSN weave; in it, you will also learn an alternate way to make the RSN pattern.
- Rhinos Shaken Not Stirred – This is my own variation that I developed when I thought, “I wonder what would happen if I…”. It’s a lot of fun to put together, and gives the base RSN a new look. (I also show you a variation of Rhinos Shaken Not Stirred, so you actually get an additional pattern.)
Plus all the standard information like jump ring size, appropriate ARs, supplies and even an appendix with a refresher on a basic technique. For the Rhinos Shaken Not Stirred, I also show you examples made in other ring sizes, gauges and colors so you can get an idea of what you can do with it.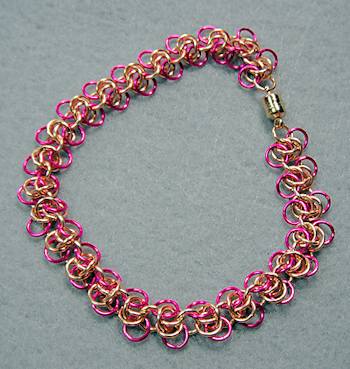
Get Your Copy of the Chainmaille Tutorial
The tutorial is in the form of an ebook (.pdf file). It has 20 pages and 35 photos. You get a lot of very close-up photos so you see exactly where each ring goes, as well as written instructions.
All you need to do is click the “Add to Cart” button. The tutorial is in ebook form — it is not a printed book. Because of the nature of the tutorial, I don’t provide refunds, but I do my very best to over-deliver for you.


The tutorial is immediately available as a digital download. This means that whatever time of day or night, you can download a copy — no waiting!
So get your Chain Mail Tutorial for the Rhinos Snorting Drano weaves for just $5 and you can be learning in just a few minutes. Enjoy!!!!!
Shaggy Loops Chain Maille Video Tutorial
This Shaggy Loops chain maille video tutorial is for a pair of earrings in this fun chainmaille jewelry pattern. It’s simple but fun, and it can be dressed up or down in so many ways.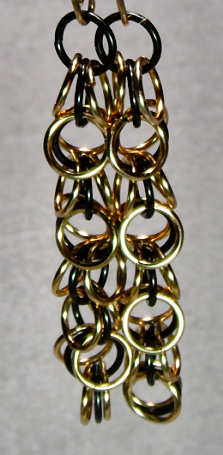
This particular weave is best used in earrings. Not that you can’t use it to make bracelets or necklaces, but the pattern shows itself best when hanging vertically.
 This video tutorial is for the basic pattern, which is the gold and black version. I also show two additional variations and talk about how I made them.
The Weave Overview
The base of this chain maille jewelry pattern is a simple one-in-one (sometimes called 2-in-2) chain. It’s as basic as you can get — putting one through through another.
The “shag” is the extra loops you place on the base chain. These loops only go through one jump ring.
The base pattern uses the same size jump rings for everything — chain and loops. I show the earrings done in 18 gauge rings with a 6mm inside diameter (ID). In actuality, you can pretty much use any gauge, any ID you’d like. So if you don’t have the 18 gauge 6mm IDs laying around, feel free to use whatever rings you have on hand. It’s that forgiving a weave. 🙂
Supplies for the Shaggy Loops Video Tutorial
The supplies for the base pattern (the black and gold photo) are as follows.
- 18 black jump rings, 18 gauge with a 6mm ID
- 32 gold jump rings, 18 gauge with a 6mm ID
- Pair of earring findings
- Two pairs of pliers.
That’s it. As an FYI, you’ll notice that my pliers have a white coating on their tips — it’s the Tool Magic dip. It’s totally optional; I just like using it because it gives me a better grip on the jump rings, and prevents them from marring. (For more info, see the post on chain maille pliers.)
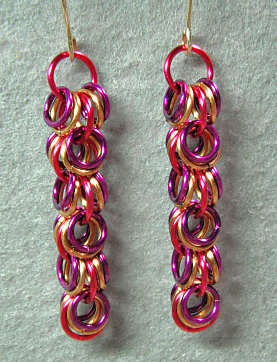
If you want the supply info on the two variations I show, the list for these is below the video. So start by watching the video and then take a look at the supplies for the others if you like.
Supplies for the Shaggy Loops Variations
If you enjoyed learning how to make the basic pattern, maybe you’d like to try one or both of the variations. Here is the info on the jump rings and beads. (It’s a given that you will need earring findings and pliers.)
Magenta Earrings:
- 14 magenta jump rings, 18 gauge 6mm ID
- 24 bronze jump rings, 18 gauge 5mm ID
- 24 amethyst jump rings, 18 gauge 4.5mm ID
Beaded Earrings:
- 50 silver jump rings, 18 gauge 6mm ID
- 96 iris seed beads, size 8