Beaded Chainmaille Jewelry Tutorial — Video 1
Beaded Chainmaille Tutorial Project
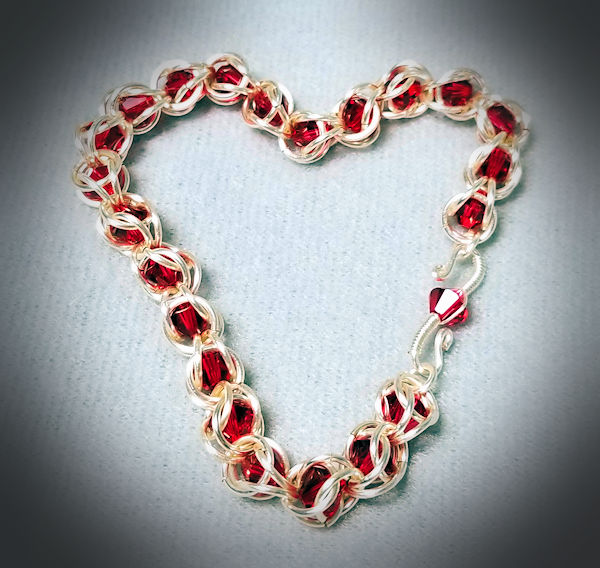
Beaded chainmaille jewelry tutorials are less common than standard chainmaille jewelry patterns, and I thought it was time that I did a video showing some patterns with beads. This is a project video, where we’ll make a bracelet. I also will show some other design options.
Oh, and why do I say “Video 1”? Naturally, I plan for more beaded chainmaille jewelry patterns!
Why Beaded Chainmaille?
Now I have a lot of different chainmaille bracelets — right now I’m wearing a roundmaille, a Turkish roundmaille and a Jens Pind. But up to this point I hadn’t done anything with beads, except as a dangle off an earring. Beaded chainmaille is a change of pace — and I am looking forward to making a bracelet incorporating sterling and pearls.
Supplies You’ll Need
All of the ring gauges list below are AWG. When I say 18 gauge, I mean a 1mm wire diameter.
- 18 gauge 6mm inside diameter rings (AR = 6)
- 6mm bicone beads — I am using Swarovski, in the color Scarlet.
- 18 gauge 3.5mm or 4mm inside diameter (AR = 3.5 or 4)
- Clasp of your choice
You will need approximately 3 beads and 12 of the 6mm ID jump rings per inch of finished chain. As for the small jump rings, you will only need two or so, depending on what kind of clasp you plan to use. (In my case, I elected to make an “S” clasp that used one of the Swarovski bicones.)
If you want to make the green and gold bracelet, you’ll need more of the smaller jump rings and fewer of the large jump rings and bicone beads. And if you want to add a dangle or charm, you’ll need to include those.
Beaded Chainmaille Video Tutorial
Ready…set…let’s get maille-ing with this beaded chainmaille bracelet!
Chain Maille Tutorial – HP 3in1, HP 4in1, DragonBack
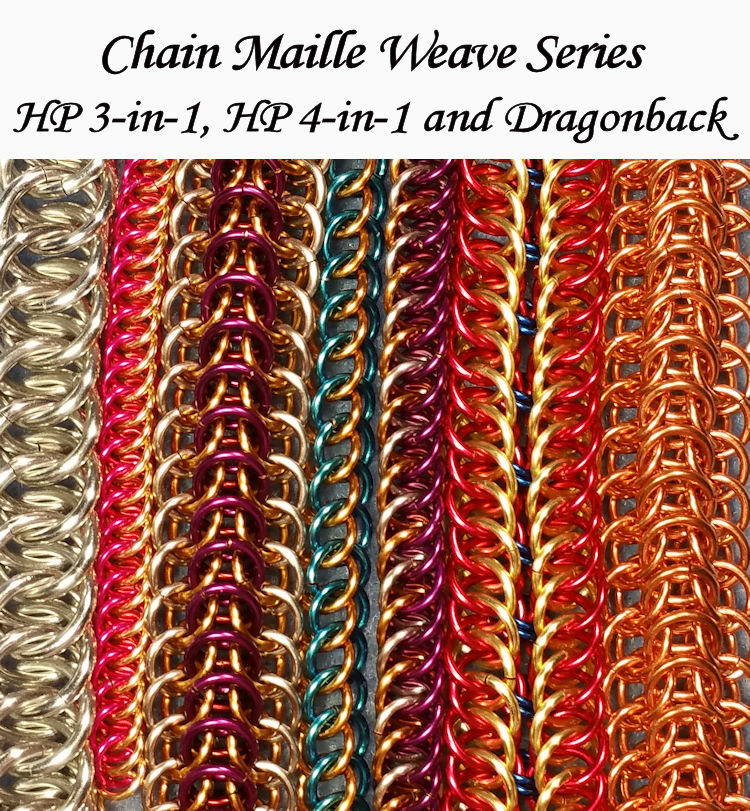
HP 3in1, HP 4in1, DragonBack
The chain maille HP (Half Persian) weaves are intriguing and DragonBack is exciting! Well, at least that’s my opinion. How a person can take the small rings and make such a densely-woven piece of jewelry was amazing to me. Welcome to the HP world!
I know that HP has the reputation of being difficult, but it really isn’t — at least not without a little help in the very beginning (which of course I provide). Then like most weaves, once you have the rhythm, it’s not all that hard at all! There are lots of very detailed photos to show you what ring goes where.
(Note to anyone reading this post on Google Translate — this ebook is written in English.)
What’s in the Tutorial?
We’ll start out with the easiest of the weaves — the HP3in1. With a couple of tips in the very beginning on how to start the weave, it becomes a whole lot easier!
Once you have the hang of that weave, time to move onto the HP 4in1. This is a beautiful, very dense weave. Once again I provide two different ways to start out the weave to make things that much easier!
DragonBack Chain Maille Bracelet
Do you want to double your fun? How about a doubled HP 4in1! It’s actually pretty easy, and it’s reversible in a way that can give you two different looks.
We’ll finish up with DragonBack, which is a weave that is rather unusual and not often seen. It, too, is a dense weave, and it makes a very substantial piece of jewelry. Not to mention an absolutely gorgeous one! But please note — DragonBack and the more commonly-seen DragonScale are not the same weave. In this ebook I teach you DragonBack.
With these weaves, I demonstrate each weave in at least two different color rings, so you can more easily see how the weave is put together. I also show some common mistakes, how to recognize them quickly and how to fix them.
There’s lots in the ebook. It’s 37 pages and has 79 photos, so you have a lot of instructions and plenty of close-ups. The photo at the top of the page shows all the weaves you’ll find in this ebook tutorial. This ebook is in PDF form, and is just a little over 1.6 MB in size.
Purchase the Tutorial
The ebook is just $6, which is a small amount for everything you get, especially with the super-close-up photos — which many times I show multiple angles so you are sure where to put that next ring!
You can buy the ebook securely through the link below. All major credit cards are accepted. Just as an FYI, it does go through the PayPal interface. You will get a link for an immediate download — and then you’re on your way!


Thanks so much for reading this far, and happy maille-ing!
Jump Rings for Maille — Part 2
I already discussed precious metal jump rings for maille, so this time let’s talk about the base metal rings. Aside from what they are made of, is there anything else you need to think about? In a word…yes! 😉 So let’s talk about the differences in base metal jump rings and precious metal rings.
AWG, SWG and You
You probably are familiar with wire gauge, which is the thickness of the wire. For jewelry, the gauges most often used are 16, 18 and 20. So far so good, right? Well….there’s this little thing called standards for measuring wire. And the two main standards — AWG (American Wire Gauge) and SWG (Standard Wire Gauge) aren’t exactly the same for all gauges.
Yep, I just ruined your day, LOL. 😉
OK, what does this mean anyway? It means that depending on the kind of jump rings you are buying, you may have to think twice about what you’re getting!
When it comes to jewelry findings, you normally see things measured based on AWG. However, in the world of chain maille jump rings, you may also run into SWG measurements, which are thicker.
Example: for a wire that is 18 gauge, AWG says it’s 1mm in diameter. However, the SWG measures it as 1.22mm in thickness. This obviously makes a big difference in AR, since 1.29mm is a size 16 in AWG.
So the moral of the story is….know if the jump rings you are thinking about buying are measured as AWG or SWG.
Chain Maille Jump Rings – Base Metals
 OK, enough about gauges – let’s talk metals. Base metals are basically anything except those designated as precious (and in the chain maille jewelry world, precious means silver, gold, niobium and titanium.)
The most common base metals used in jewelry are copper, brass, aluminum, bronze and stainless steel. One thing these all share is that they are pretty inexpensive! But each metal has pluses and minuses, as you will see.
Copper
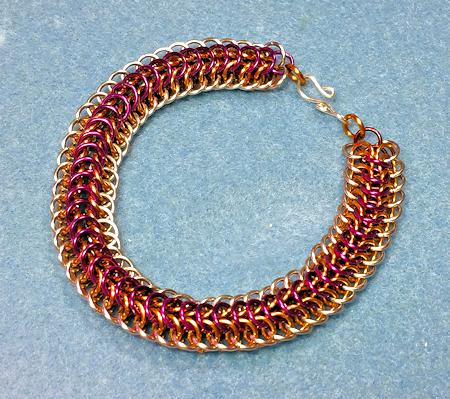
Copper is a relatively soft metal, which makes it easy to manipulate in the thicker gauges. The two main ways you can get copper jump rings are “natural” (not treated in any way) and enameled.
Enameled copper rings are colorful — just about any color you can think of is available. The down side is that since the enameling is just a surface treatment, it can be scratched. The bracelet you see to the right is made from enameled copper.
Natural copper is lovely, but it does oxidize pretty easily so you’ll have to spend some time getting rid of the tarnish (lemon juice and/or ketchup works well).
Brass
Stiffer than copper, brass comes in two main “colors”. One is regular brass, which has a bright yellow hue. The other is called red brass, which is a more golden color (not as “brassy”). The red brass is also sometimes called nu gold, jeweler’s brass and merlin’s gold.
Brass also tarnishes easily, so keep that in mind. And also keep in mind that by the time you get to 16 gauge, the jump rings are going to be more difficult to manipulate.
Aluminum
Aluminum is very popular for chain maille as it is both inexpensive and light. It also comes in a wide variety of anodized colors. (Reminder; anodization is a surface treatment and can be scratched.) Bright aluminum is a bright silvery color, and works really well. Just make sure you do not get regular aluminum, as you will get black rub-off all over yourself.
I mentioned that the aluminum rings are lightweight, which makes them great for earrings. But if you like jewelry with a hefty feel, this isn’t the metal for you. On the other hand, it means that you can make something large and still keep it comfortable. For example, a dragonscale collar in silver would be on the verge of being uncomfortably heavy, while the same collar in aluminum would feel much lighter.
Bronze
Don’t confuse bronze the metal with bronze-colored. For example, there are bronze colors in enameled copper and anodized aluminum. But bronze the metal is an alloy of copper and tin. It has a reddish-gold color, and as you might imagine it tarnishes (because of the copper content).
Bronze is a stiff metal, so once again it will be tough to manipulate in the heavier gauges. It can be a little on the brittle side if you over-work it.
Stainless Steel
Really popular for men’s jewelry, stainless steel is heavy and has a nice shine to it. But don’t make the assumption that stainless or surgical steel are hypoallergenic, as they may not be – it depends on the amount of nickel used in the alloy. And it’s usually pretty tough to find that out.
Steel is really stiff, and if you work in gauges thicker than 20 gauge, you’ll need heavier-duty pliers. Not to mention a few muscles!
Gotta Get Rings
One more thing to think about is if you are buying these jump rings from a jewelry supplier is this: is the size of the ring based on the outside diameter or inside diameter. After all, an 18 gauge inside diameter jump ring is roughly an 8mm outside diameter. While a 6mm outside diameter is about a 4mm inside diameter. Biiiiiiiig difference!
Jump Rings for Maille – Part 1
Now it’s time to talk about jump rings – materials, sizes and that dreaded term…aspect ratio. ‘Cause face it — without jump rings, there is no chain maille.
 When I started with making chain maille there wasn’t a huge variety of jump rings for use with jewelry. Most of the ring suppliers catered to the non-jewelry market. The jewelry supply stores sold rings based on outside diameter (OD), so you had to figure out the inside diameter (ID) yourself. Not to mention there wasn’t a huge variety of gauges, sizes or materials.
Now things are all changed — we jewelry artists have access to all kinds of wonderful rings in loads of materials and sizes. Woo hoo!
Chain Maille – Art, Science or Both?
No doubt about it, maille is an art; all one has to do is look at the myriad items, jewelry or not. But there is also a scientific aspect to making maille, because for many patterns, you need rings of a specific size. That size varies according to the gauge of the wire. Yikes — head spinning yet?
This relationship between gauge and size is called the aspect ration (AR). It’s a term guaranteed to make your eyes glaze over, LOL. However, it’s something you do need to know about if you want to maille.
You don’t have to know the math, but you do need to know the AR (or know how to find it) for any given ring. For example, the pattern Jens Pind requires a very specific AR in order to work; it’s a very narrow range. Something like European 4-in-1 is a lot more forgiving, but it still needs a certain range of sizes in order to look its best.
I wrote up an ebook (free) about AR, and it has a nifty chart in it that lists the ARs for some of the most common jewelry maille ring sizes and gauges. So here you go – chain maille rings.
So yes, there is science involved — but when has science been this much fun?
Ring Materials — My Precious….
When I was starting to maille (back in the stone ages I think), sterling silver was pretty cheap, so I mostly used sterling. Plus, it was one of the few metals that I could get rings for in a variety of ARs and gauges.
These days sterling is not exactly cheap, but there are all kinds of other materials now so I am not too disappointed. While I still love silver, my heart has been wooed by colorful rings in aluminum, copper, niobium and titanium. That being said, let’s talk materials. I’ll start with the metals classes as “precious” in chain maille terms – gold, silver, niobium and titanium.
Gold
Gold is gorgeous, no doubt about it. It’s available in yellow,white and rose; as solid and gold-filled. Gold-filled is much less expensive than solid, and is a great alternative to the (sky-high) price of solid gold. And gold-filled is not the same as gold-plated.
Plated rings have a thin layer of gold over a base metal core. Gold-filled on the other hand has a very thick layer of gold bonded to a metal core (usually brass). In terms of wear-ability, it’s just as durable as regular gold.
Gold’s main drawback is price – even gold-filled is pretty expensive. However, you can still use gold as an accent, even if you can’t manage to make an entire bracelet or necklace with it.
Silver
Silver comes in many forms – argentium, sterling and the new silver-filled. Argentium has the same amount of silver as does sterling; it just has different metals alloyed. Sterling includes copper, which is why sterling tarnishes fairly easily. Argentium doesn’t have copper, so it’s sometimes billed as “non-tarnishing”. It’s more accurate to say that is slower to tarnish.
There is the new silver-filled jump rings out on the market. These rings are similar to gold-filled – same basic principle, except with silver.
Niobium
Niobium is best known as a hypoallergenic metal. It’s naturally a gray color, but can be anodized to all sorts of lovely colors. (I will explain what anodized means a little further below.)
Niobium is a bit heavier than silver or gold, so keep that in mind when you are designing earrings.
As far as price, it’s less expensive than silver, but more expensive than the base metals.
Titanium
Titanium is famous for being light and strong, but it’s also one of the hypoallergenic metals. Many people who can’t handle even niobium can wear titanium. It’s naturally a silvery shade, and it can also be anodized to other colors.
As I mentioned, titanium is light. It can be good for earrings, but it could also be a “minus” if you like your jewelry to feel substantial.
And titanium is a very stiff/strong metal, difficult for most people to manipulate in gauges thicker than 20. Definitely keep that in mind or you may be staring at your rings instead of using them. 😉
Price-wise, it’s about the same as niobium.
Anodized Explained
I mentioned the term anodized in relation to niobium and titanium, but what is it exactly? It’s defined as a “process used to increase the thickness of the natural oxide layer on the surface of metal parts”.
Huh?
To put it more simply, a metal that is anodized has had a current passed through it, and that current changes the surface of the metal to a different color. Different currents produce different colors.
Think of copper — when it oxidizes, it turns brown, green, gray, etc. Copper oxidizes from exposure to air and also from the chemicals in a person’s body. Anodizing is a little different in that it doesn’t happen naturally (like in silver and copper), and only happens with metals that are naturally reactive to the process. In the chain maille jump ring world, this means niobium, titanium and aluminum.
I’ve already made this post long enough, so I’ll do a separate one for the base (i.e. non-precious) metals. See you later!